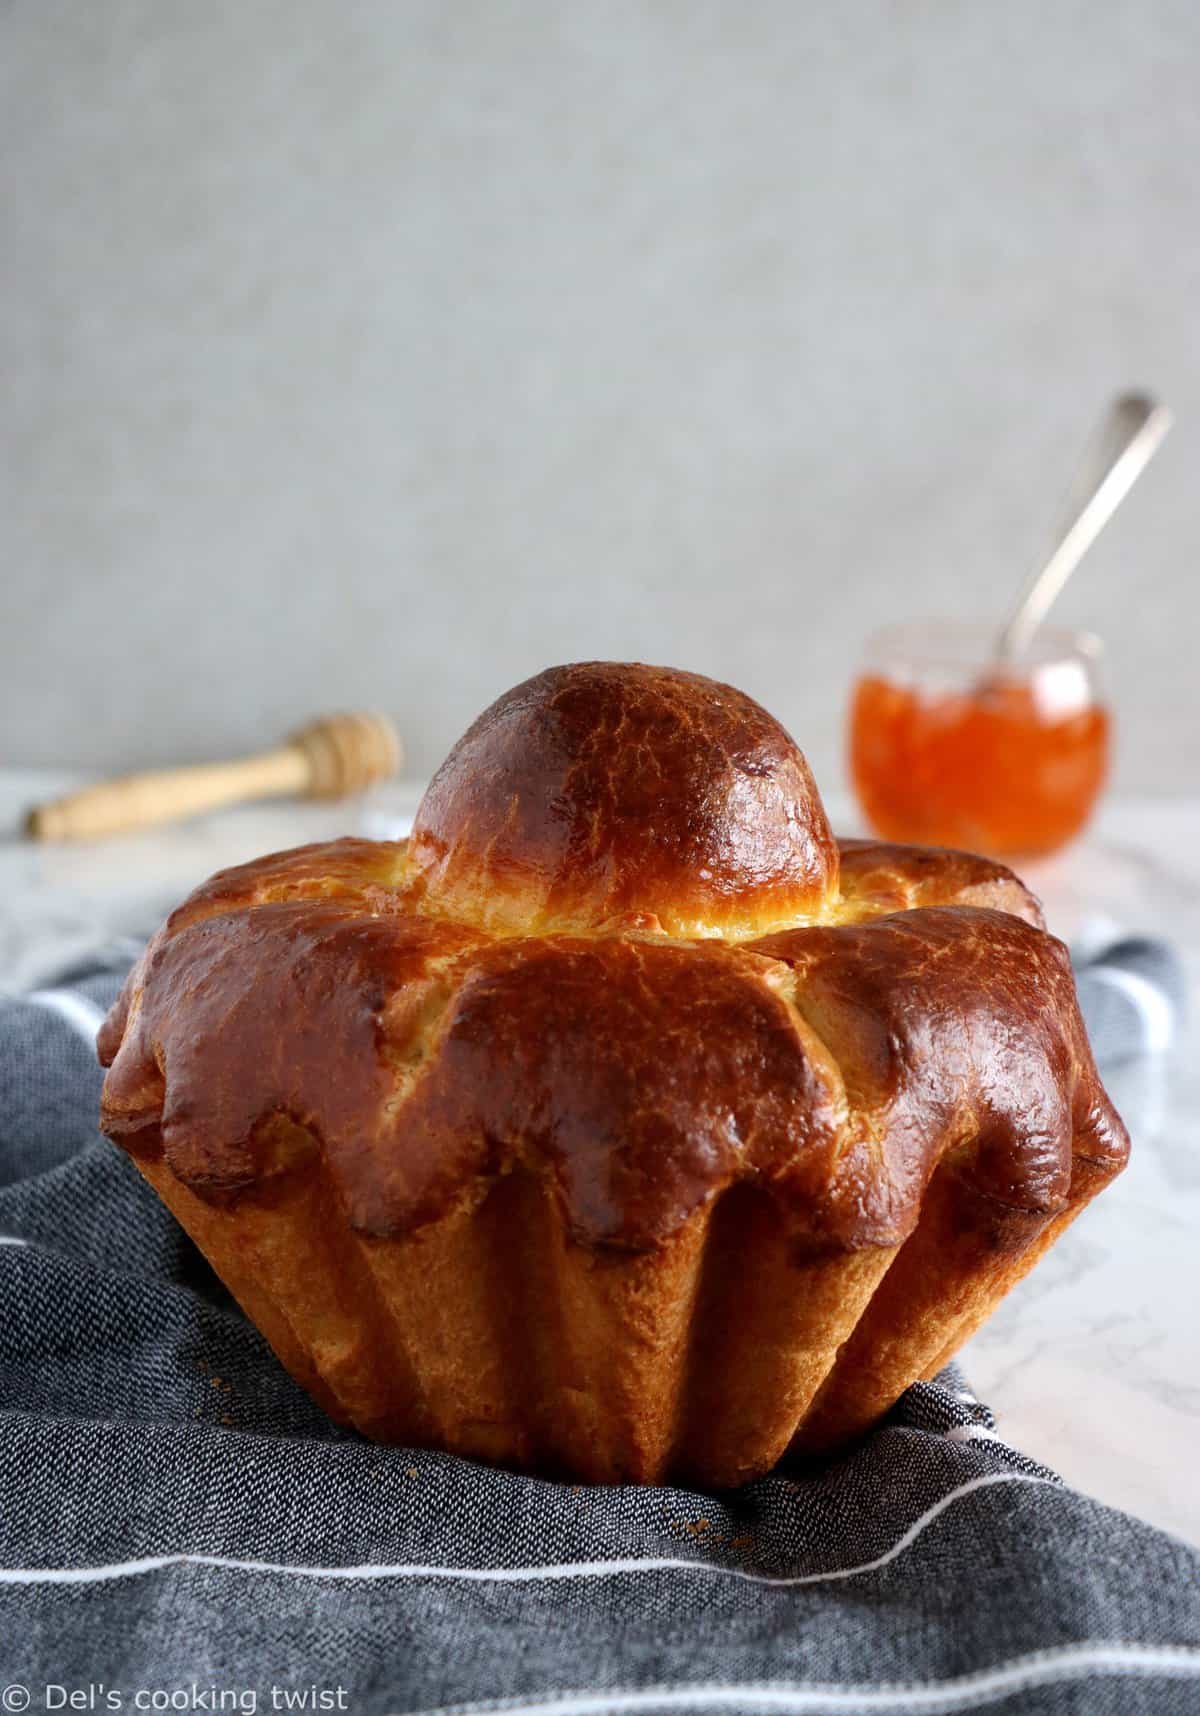
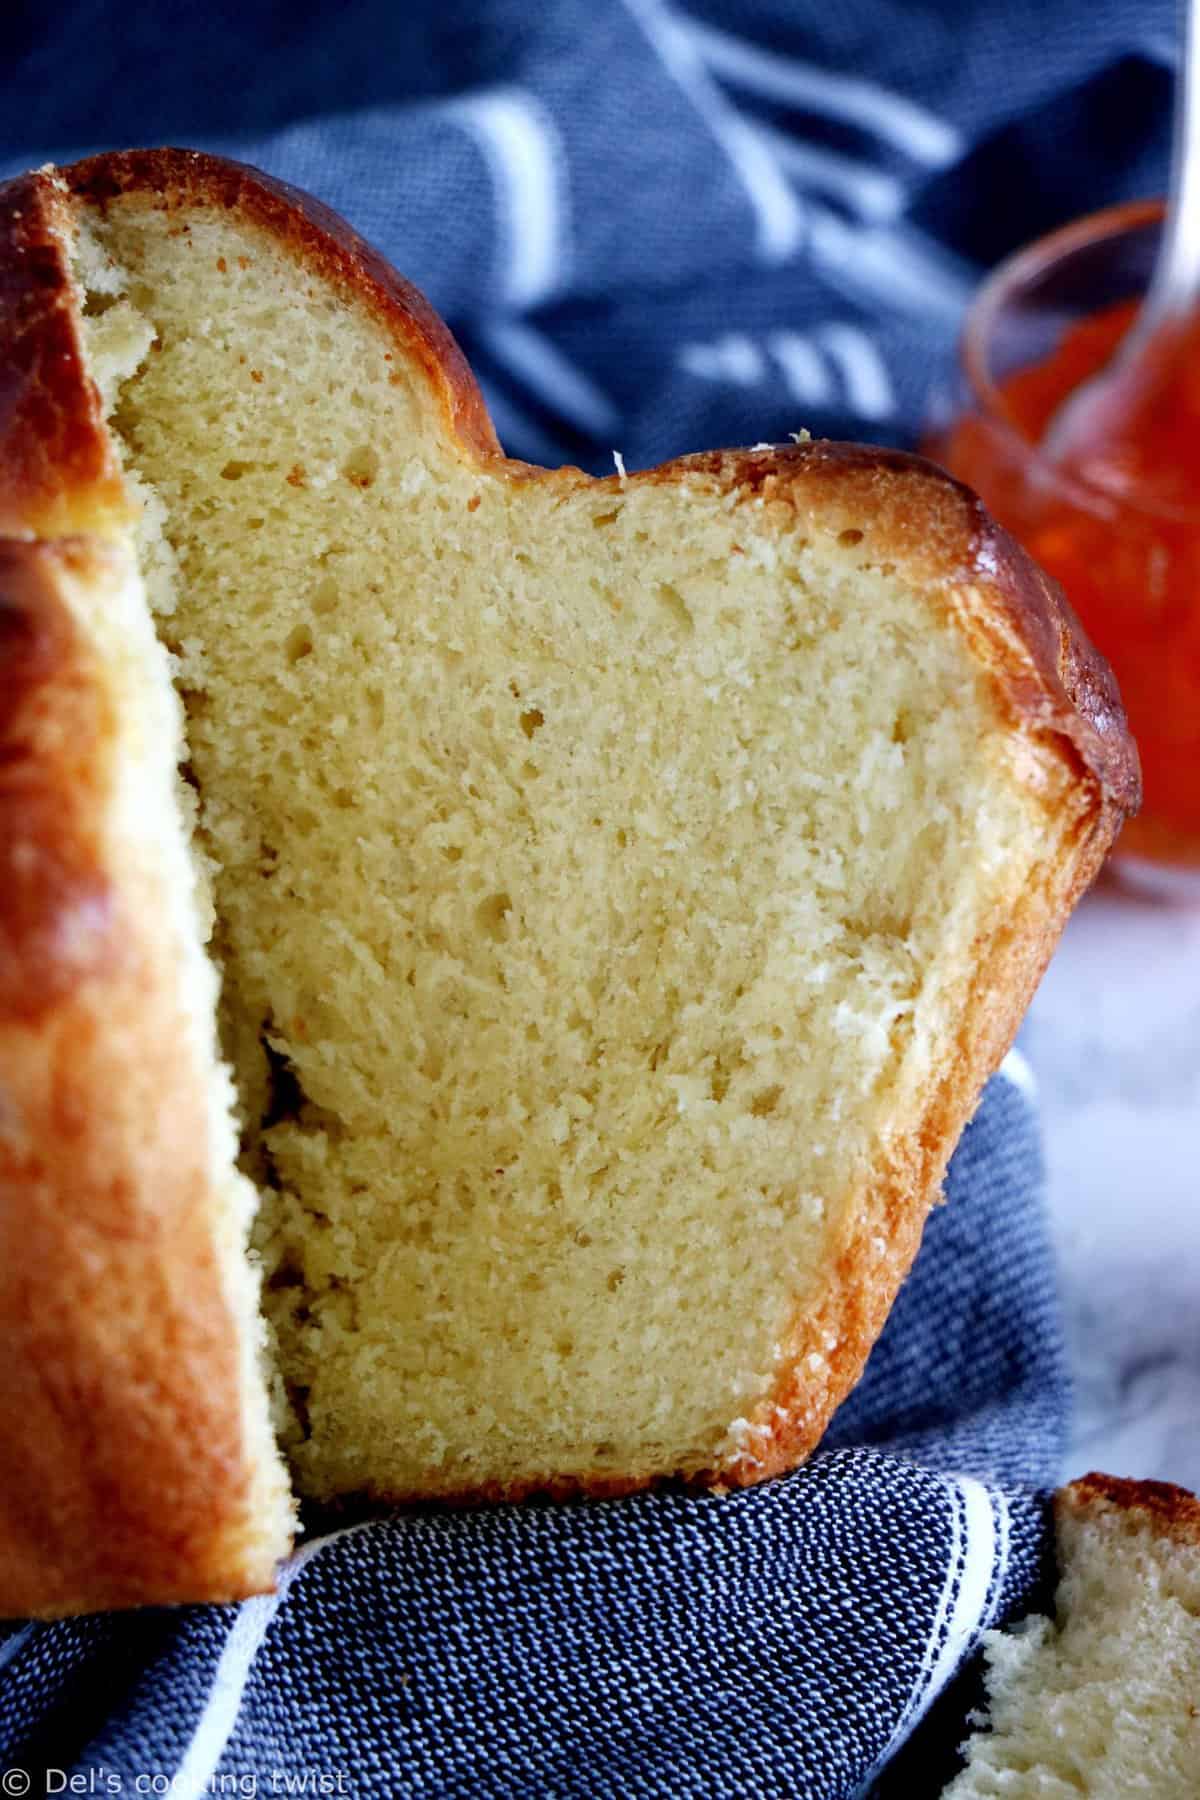
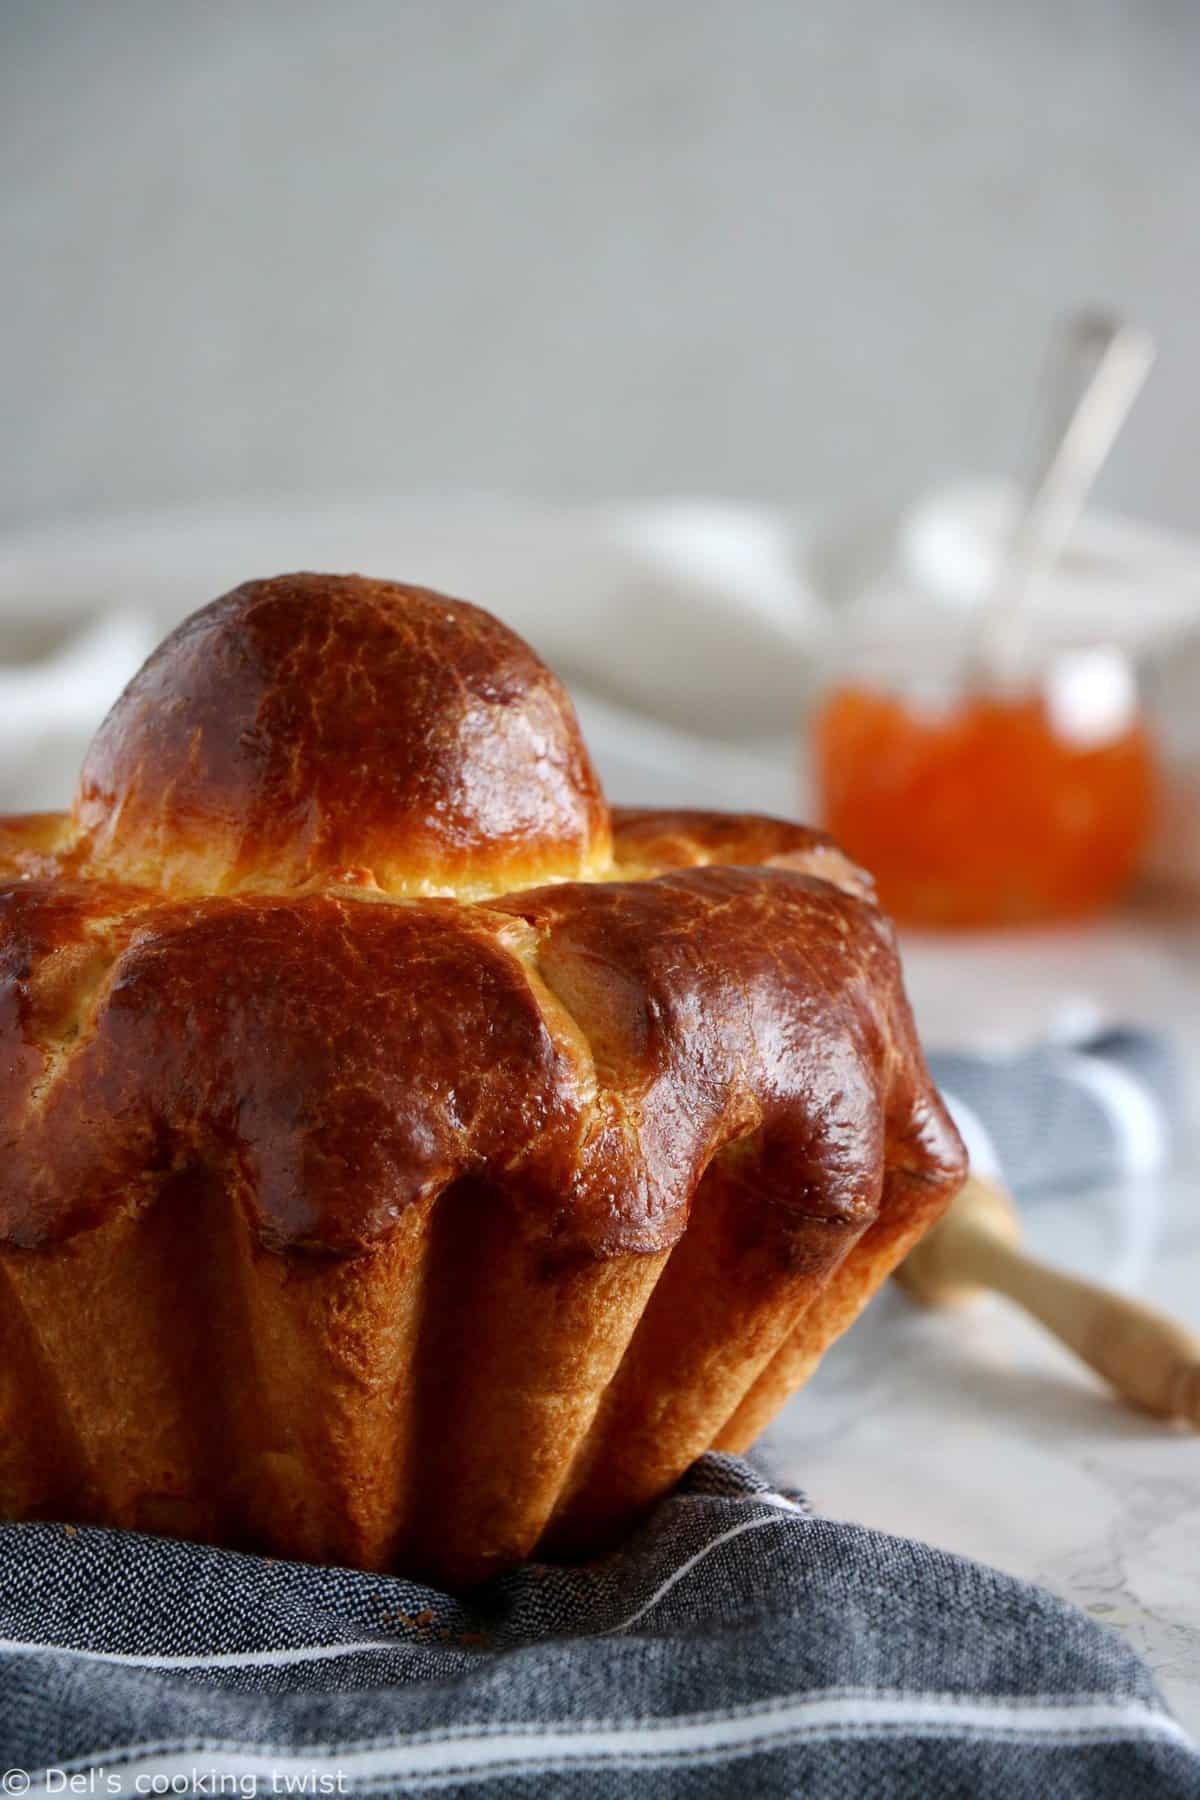
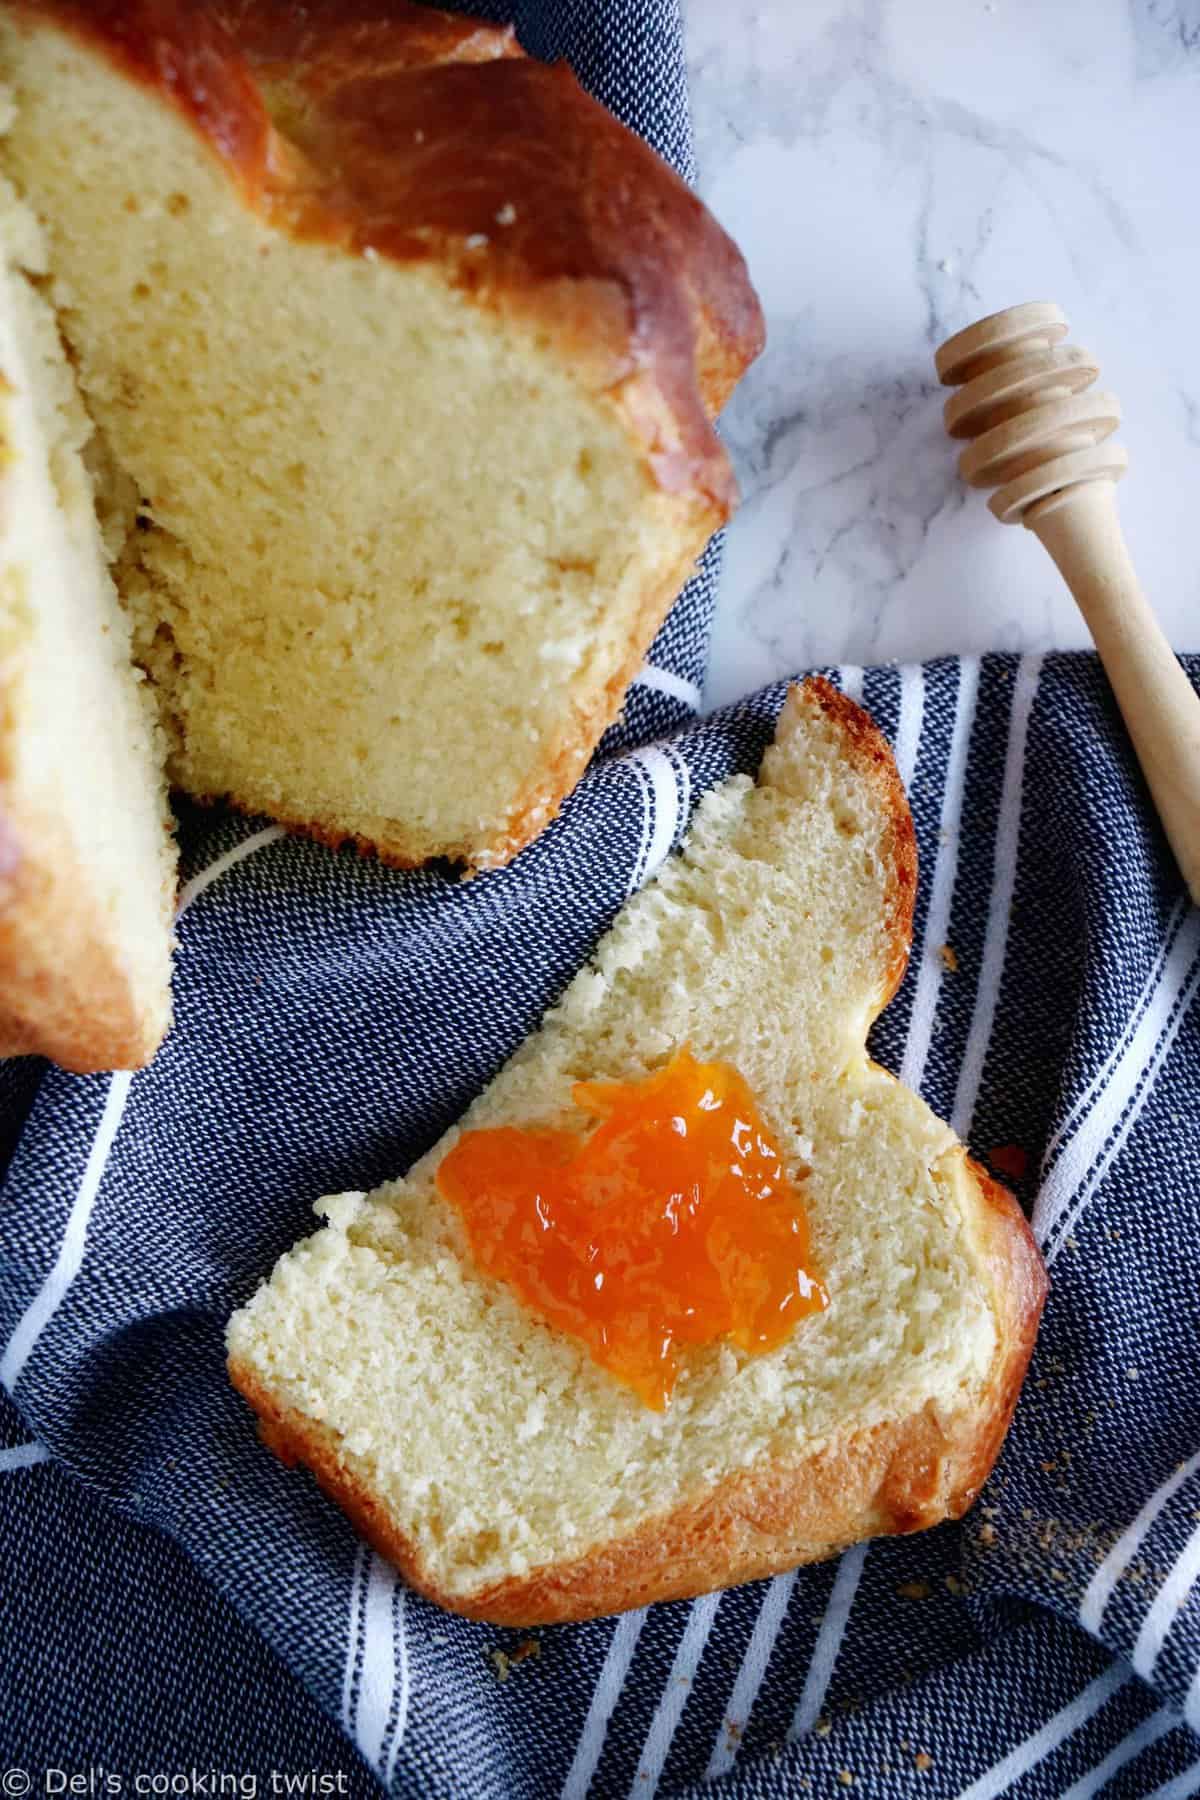
Buttery and rich in flavor, this beautiful golden brown French brioche will surprise you by its extremely soft and airy texture inside and its slightly crispy crust on the outside. Enjoy with fruit jam, as the French do, and a cup of coffee!
Remember, I promised you a French baking recipe each month in 2018. Well, as you can see we are February 28th and I almost didn’t make it this month! Not that I forgot, not at all, but I was not happy with the result of my recipe, so I added a few additional recipe testings. Finally, after 3 attempts and lots of energy, thinking and science, I got the exact texture and flavor so I’m just on time to share you my new recipe: a French brioche à tête.
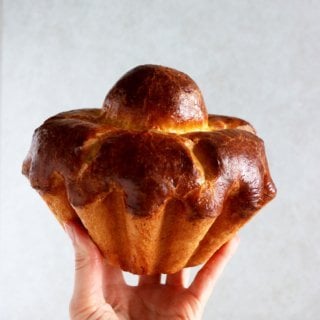
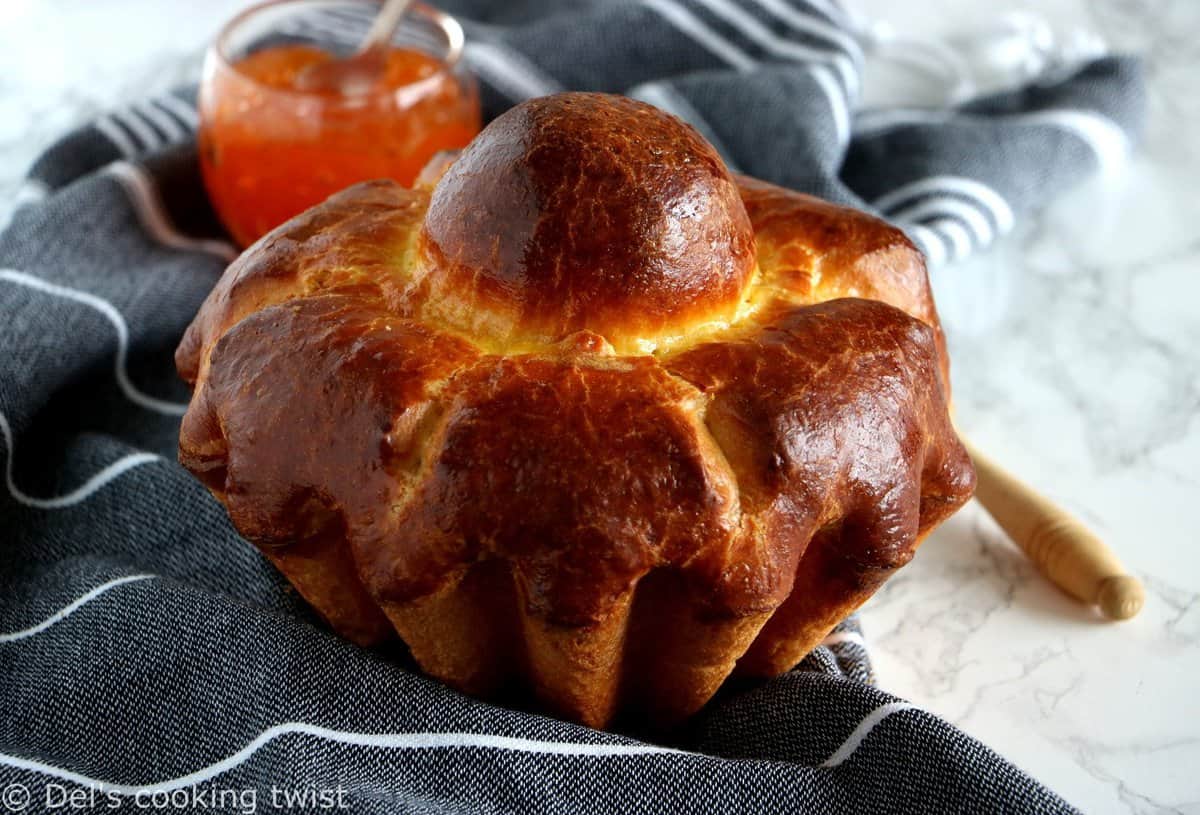
But let’s start with the beginning here: Have you ever heard of a so-called “brioche à tête” and do you even know what it means? Easy peasy when you’re French, so I’m here to help with translation: “tête” means head, and as you can see the brioche here has a head, so brioche à tête is simple a brioche with the shape of a head on top. We love it that way in France, but you could shape it differently if you wish: as a braided braid or in a loaf tin for instance.
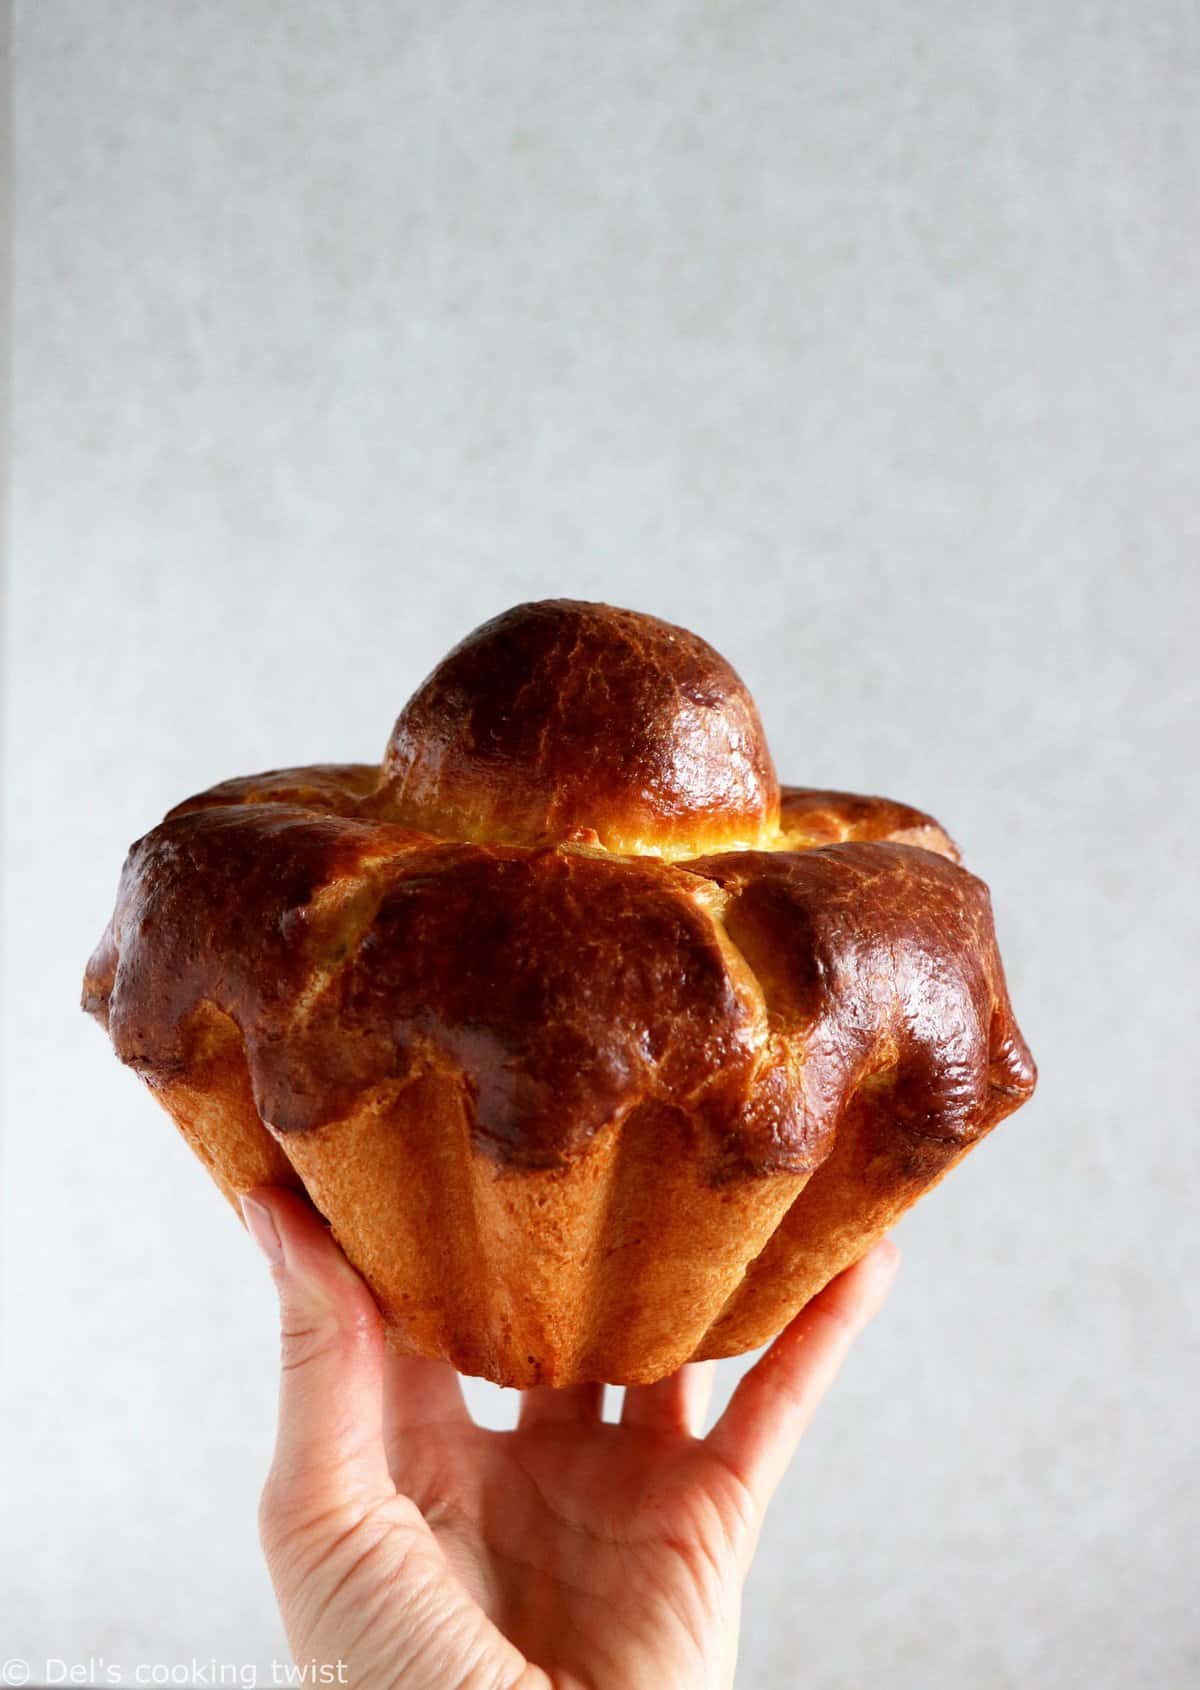
What matters here is the brioche dough. You want it exactly as they would serve it to you in a French bakery or café in Paris. The texture has to be crispy on the outside with a lovely golden brown color, contrasting with a white and soft, airy texture inside, slightly sweetened and deliciously flavored with vanilla aroma. You don’t want it differently. If it’s too dense with a cake look alike texture, then it’s not right. French baking is precise in both the ingredients and the recipe instructions, and you would rather stick to the recipe that go your own way with a little bit of fantaisy, unless you are already a master with years of expertise.
I, myself, baked my very first brioche when I was 15, at home, with no knead machine, just my little hands. I remember I was half happy with the result as the texture didn’t turn out as expected (far too dense, almost hard with a bitter taste of yeast). I remember saying myself that I would never give another attempt, as French bakers could do it right for me, and living in France by the time, they were in every village, town, city… well, everywhere. So why the need of baking your own after all?
Well, for the fun of it if you ask me today, as I love working with brioche doughs, and also because I love to challenge myself. Last but not least, I have now lived abroad for the last 8 years, and there is no need to say that the context is different from where I was 15 in France. Here in Chicago, we can occasionally find some French baking shops selling brioches, but it’s not a regular thing. So somehow, if you crave brioche, you’d better bake your own. So now let me tell you my secrets to bake a beautiful brioche, based upon my own experience.
1. The kneading part – I highly recommend the use of a stand mixer to knead the dough. I personally love kneading bread and brioche by hand, but for this specific recipe, it can be hard and clearly discouraging, as you will be working with a rather sticky dough for quite a while until it finally turns out smooth and elastic. The brioche requires about one hour kneading with a stand mixer, longer by hand, while being energetic all the way through. It’s a great workout for you arms!
2. The yeast – After several attempts, I find the result much better and convincing using fresh yeast, which I know is not easy to find in the US (there are some fresh yeast cubes at Mariano’s and Whole Foods however). You will need to dissolve the yeast in some lukewarm water and/or milk (I used half and half). Then, let sit for about 15 minutes or longer before using it, adding all the ingredients except butter.
3. Butter comes last – you will first knead the dough for about 20 minutes on low speed, and after this process only you add softened butter, little by little. The choice of butter is also important in this recipe: you want it rich, with at least 82% of fats, and preferably unsalted as you will already add a great quantity of salt in the dough. If you only have salted butter, cut the quantity of salt by half.
4. The rising part(s) – maybe the most important to get the perfect texture. Once your dough is ready and kneaded, you 1/ shape it into a ball and then let it rise under cover at room temperature for 1 hour or so, until doubled in size. 2/ Then you reshape your dough quickly and place in the refrigerator for 4 to 12 hours (overnight is best). This process enables the flavors (here vanilla and rum) to develop fully and slows down the yeast activation while the dough hardens a little bit. 3/ After that, you shape the brioche, brush with egg mixture, and let rise a third time in a warm environment (I leave it close to the oven if still warm) for… 1 hour and 30 minutes. Don’t forget to cover with a cloth so you don’t get a huggly hard and wrickly crust. Your brioche will double in size again. So yes, the brioche dough recipe calls for no less than 3 long rising times, and they are mandatory.
5. The final touch – just before baking in the oven, brush with egg mixture a second time. When golden brown, your brioche is ready. Remove from the oven and carefully transfer to a wire rack to allow to cool completely. It also helps to keep the inside of your brioche light and airy. I know it’s hard to resist, but please don’t slice your brioche until it’s cooled or the inside risks to collapse, which of course you don’t want.
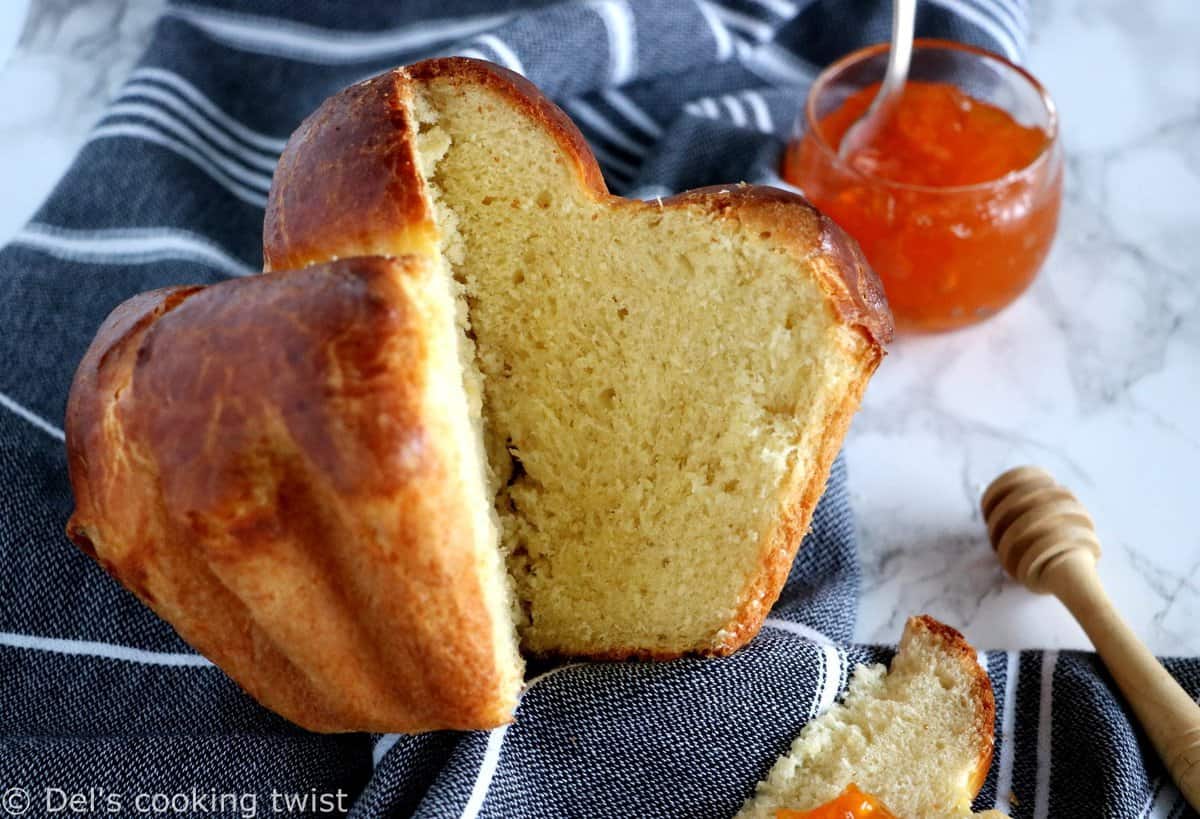
Before leaving you with the recipe, here are a few serving tips I recommend: warm your brioche up 5 to 10 minutes in the oven at low temperature so it becomes just lukewarm. Then you can either enjoy it plain, dipping it in a cup of coffee, or spread some marmelad and other fruit jams on top. After a few days, when your brioche is not as fresh anymore, you can use it to make a fantastic French toast. The ones made with brioche instead of bread are always my favorite, I even serve them as a dessert, drizzling some caramel sauce on top and serving with vanilla ice cream.
You’ve been very patient reading all this, and that’s great because that’s exactly what you need for this brioche recipe. Time and patience are your best friends. Now you deserve the best part, the recipe!
PrintFrench Brioche à tête
- Prep Time: 12 hours
- Cook Time: 25 mins
- Total Time: 12 hours 25 mins
- Yield: 6 servings 1x
- Category: Breads & Brioches
- Cuisine: French recipes
Buttery and rich in flavor, this beautiful golden brown French brioche will surprise you by its extremely soft and airy texture inside and its slightly crispy crust on the outside. Enjoy with fruit jam, as the French do, and a cup of coffee!
Ingredients
For the brioche:
- 0.7oz (20g) fresh yeast
- 1 Tablespoon water
- 1 Tablespoon milk, lukewarm
- 2.2 oz (60g) sugar
- 3 large eggs
- 1.35 fl oz (4cl) rum
- 1/2 vanilla pod, seeded
- 17.5 oz (500g) all-purpose flour
- 0.35 oz (10g) salt
- 9 oz (250g) unsalted butter, at room temperature and diced
For brushing:
- 1 egg
- 1 Tablespoon water
- 1 pinch salt
Instructions
FOR THE DOUGH :
- In the bowl of a stand mixer, dissolve crumbled fresh yeast in water and lukewarm milk with a spoon. Let sit for about 15 minutes.
- Pour in sugar, eggs, rum, vanilla seeds, flour and salt, and mix on low speed with a paddle attachment for about 10 minutes.
- Add butter softened at room temperature in a few additions, and knead on low-medium speed until the dough becomes smooth and doesn’t stick on the sides anymore, about 30-40 minutes.
- Cover the bowl with cling film and let rise at room temperature until the dough doubles in size, about 1 hour.
- Re-shape the ball by hand a little bit to release the air from the dough. Put back in the bowl, cover with cling film, and place in the refrigerator for 4 to 12 hours (ideally overnight).
SHAPE THE DOUGH:
- Remove the dough from the refrigerator and reshape a little bit. Grease a tinned-steel brioche mold.
- Shape into a thick oblong log and cut a quarter (1/4th) of the dough, that you will use for the brioche head.
- Shape the bigger part (the remaining 3/4th of the dough) into a smooth ball, hiding the folds underneath. Using 3 fingers joined together, pierce the dough, making a hole large enough so it looks like a donut. Carefully transfer the dough into the brioche mold.
- Take the remaining quarter (1/4th) and shape into a small ball. Using your hands, carefully roll out one side so it looks like a big drop. Place the thiner part of the head ball into the donut hole, and press with floured finger tips all around to make sure it seals the sides.
- Brush with the egg mixture, and keep the excess for later.
- Loosely cover the brioche with a cloth to prevent the dough from hardening, and let rise in a warm environment (from 77-86 F / 25-30 C) for about 1 hour and 30 minutes. The brioche must double in size.
- Preheat the oven to 350°F (180°C).
- Brush one more time with the egg mixture and bake for 20-30 minutes, until the brioche is golden brown. Transfer to a wire rack and let cool completely.
Did you make this recipe?
Lastly, if you make this French Brioche à tête, be sure to leave a comment and give this recipe a rating, letting me know how you liked it. And of course, don’t forget to tag me on Instagram! Thank you and enjoy!


Martinez
Bonjour
J’ai essayé cette recette la brioche est très bonne par contre j’ai fait cuire 30 min à 180° est la brioche était encore crue au milieu
Je pense qu’il faut laisser cuir encore 10min et baisser la température
Delphine Fortin
Merci beaucoup pour votre retour. Oui en effet parfois selon les fours les temps de cuisson peuvent varier légèrement. Une astuce : couvrir la brioche d’aluminium lorsqu’elle est bien dorée et poursuivre la cuisson encore 10-15 minutes au four.
matcha
Il faut pétrir pendant 10 ou 20 minutes c’est selon si utilisation robot ou pas?
Delphine Fortin
Bonjour Gilles. C’est 10 minutes au robot, et plus à la main en effet… 20 minutes dans ce cas semble plus raisonnable. Lors de la deuxième phase de pétrissage, je préconnise 30-40 minutes de pétrissage au robot (je recommande vivement l’utilisation du robot pour cette recette), et au moins une heure à la main sinon. La pâte doit être bien lisse au toucher et non collante. En espérant vous avoir aidé je vous souhaite une très bonne journée !
Galina
Thanks, Marlynn! I love them!
sotis
elle est magnifique ta brioche, ça me donne envie de monter dans le premier avion pour venir prendre le petit dej chez toi!!!! bisous bisous
Delphine Fortin
Jet t’attends avec plaisir 🙂 Bises!
Mélina & Chocolat
Carrément trop bonne cette brioche, avec son bon goût de beurre… Trop Miam !
Delphine Fortin
Merci!! 🙂
Dubordeldanslacuisine
Elle donne vraiment envie cette brioche
Bonne journée
mélanie
Delphine Fortin
Très heureuse qu’elle te plaise. Merci Mélanie! 🙂
Maeva @ Cook A Life! by Maeva
Elle est vraiment belle ta brioche, j’en vois souvent qui poussent de travers ou dont la tête retombe après cuisson, je viendrais bien chez toi en déguster une part (ou deux tiens!) car sa mie filante me donne l’eau à la bouche ! D’autant que comme toi, j’adore pétrir mes pâtes à la main, c’est pour ça (mais aussi surtout faute de budget) que je n’ai pas de robot alors je me contenterai de m’en délecter virtuellement car plus d’1 heure de pétrissage, je n’y arriverai jamais ha ha :-p
Marie L / Allergique Gourmand
Elle est superbe ! Belle journée